My Windows 11 Ice Cream Experience
Somewhere on our planet specifically in New York, most people there did it with style, enjoying a delicious serving of physical ice cream (as depicted above) during the official launch of Windows 11 last October 5, 2021.
I will honestly concur, and confirm that it was a very cool, and "delectable" experience for me as an old school user transitioning from Windows 10 Pro to finally, Windows 11.
Now, before I go through my upgrade experience cum walk through, you all
be sure to check out my link to:
To download Rufus, click on the link below:
USB
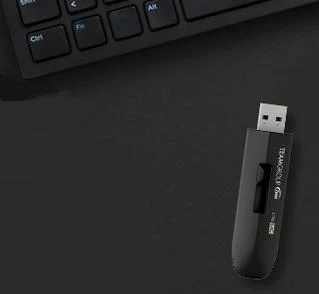
I used a dedicated USB for my Windows 11 Upgrade specifically, the TeamGroup C185.
Windows 11 ISO (Official)
Official Download link:
Here
Or click on the image below to download.
Then lastly, a drop drown selection for your language, choose then hit confirm and the downloading process will start.
And last but not the least, your Desktop PC/Laptop.
By the way, if you would like to check a blog post of mine regarding desktop PC future proofing. Link below:
3 Steps (Windows 11 Installation)
Step 1- RUN the RUFUS app.
Step 2- COPY the downloaded Windows 11 ISO (Make sure to obtain the legitimate/official ISO copy from Microsoft's site.)
Once you have completed preparing your Windows 11 ISO in your USB, you should have this status below as indicated by Rufus.
In addition, RUFUS will automatically pop up a window bearing the following information.
You have just created a media that uses the UEFI: NTFS bootloader. Please remember that, to boot this media, YOU MUST DISABLE SECURE BOOT. For details why this is necessary, see the 'More Information' button below."
Notice, that with the screenshot above, I created the Windows 11 ISO on the official launch date of Windows 11 which was last October 5, 2021. (For the record).
PAUSE HERE FIRST.
Well, it is a personal decision/choice of mine to INSTALL all Windows 10, and this new Windows 11 OFFLINE.
Well, it is a personal decision/choice of mine to INSTALL all Windows 10, and this new Windows 11 OFFLINE.
That is why I opted with the official Windows 11 ISO installation method.
If you ask me why, the reason being it always boils down to desktop PC security.
If you ask me why, the reason being it always boils down to desktop PC security.
Read on my previous indelible fingerprints blog post. Link below as follows:
In my humble opinion, nowadays, it's a high security risk updating your Microsoft Windows whilst live online whilst doing a major OS (operating system) upgrade.
And worst, you will run into risking your desktop PC getting compromised/hacked in the process that is, if it is not hardened for security purposes. (i.e., Man-In-the-Middle MITM attack, et cetera.)
Link below on my last blog post for September 2021 as follows:
Step 3- Now, whilst you are on your desktop PC/laptop, switch in to your USB drive, and doubleclick on setup.exe of Windows 11 ISO to commence with the Windows 11 setup process.
Now, let's us continue, and when prompted by the Windows 11 install page, click on NEXT.
Well, it is your choice if you want to submit installation information to Microsoft.
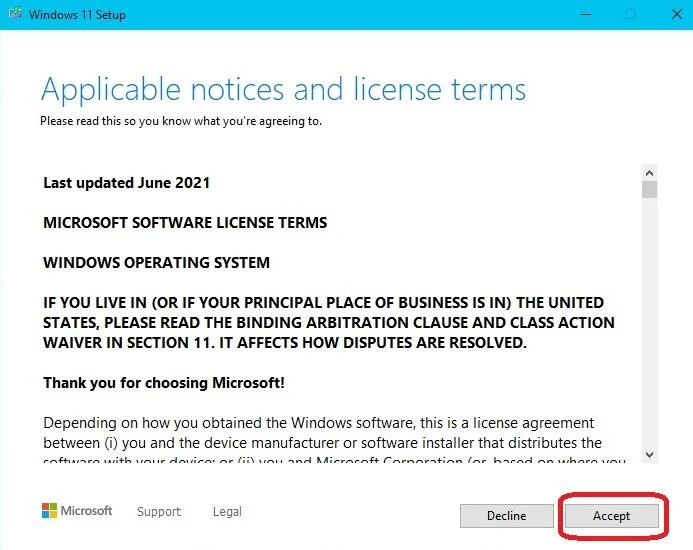
However, with the next Windows 11 setup page above regarding Microsoft Software License Terms, (last updated June 2021) this is a MUST.
No, if's or buts, just ACCEPT else, you will not be able to proceed and install Windows 11.
Click on ACCEPT.
No, if's or buts, just ACCEPT else, you will not be able to proceed and install Windows 11.
Click on ACCEPT.
Next setup page, is a stickler and it says, "Making sure you're ready to install. This may take a few minutes. Please wait."
Suspense ... ha-ha!
Again, Microsoft's super stickler follow up in checking for completeness.
Above it states, "Making sure your PC has enough space." No big deal.
Then next install page prompt is very important.
Since, I decided not to do any off the bat clean install (without files and apps), I decided to opt for installing Windows 11 as follows:
KEEP my personal files and apps.
Why? (Saves a lot of time going through the arduous and time consuming lane of reinstalling apps, and specially DRIVER compatibility et cetera.)
For me, a rule of thumb that I just won't disturb the groove, or why tinker on a state that is running perfectly in the first place.
I addition, the underlying main reason why I did not choose a clean install is, because I wanted to test how my Windows 10 security hardening will carry over my previous security settings to Windows 11.
Well, we will know that in a few. So, hang on your comfy seats/chairs.
There will be a required desktop PC/laptop boot up.
Then I have login with my Windows 10 user name and password (all retained) after the upgrade/transition.
Once Windows 11 is up and running, I did run WinVer and thus, presenting...
Microsoft Windows 11
Version 21H2 OS Build 22000.194.
Again, for security purposes, "I removed identifying information regarding my desktop PC name."
Also most importantly, head on to Windows Tools in your Control Panel and do a cursorily check relating to security.
Windows 11 lumped the following tools under Windows Tools as follows:
- Character Map
- Command Prompt
- Component Services
- Computer Management
- Control Panel
- Defragment and Optimize Drives
- Disk Cleanup
- Event Viewer
- iSCI Initiator
- Local Security Policy
- ODBC Data Sources (32-bit)
- ODBC Data Sources (64-bit)
- Performance Monitor
- Power Automate
- Print Management
- Quick Assist
- Recovery Drive
- Registry Editor
- Remote Desktop Connection
- Resource Monitor
- Run
- Services
- Steps Recorder
- System Configuration
- System Information
- Task Manager
- Task Scheduler
- Windows Defender Firewall with Advanced Security
- Windows Fax and Scan
- Windows Memory Diagnostic
- Windows PowerShell
- Windows PowerShell (x86)
- Windows PowerShell ISE
- Windows PowerShell ISE (x86)
- WordPad
As of writing, my preferred browser which is Firefox which was not affected at all with the updgrade.
Mozilla Firefox is my browser of choice when using my desktop PC.
In summary, Windows 11 upgrade was a seamless, chill and cool as an "ice-cream" experience.
Transitioning from Windows 10 to Windows 11 with my choice of OFFLINE installation using Windows 11 ISO in a USB was a complete success.
There were only two minor security settings in my PC which were affected by the upgrade/transition which I have to manually tweak as follows:
DEP SETTING
Data Execution Prevention is a technology that foils some types of
attacks when they are coded in a certain way because by default, this feature
is enabled but protects only Windows exes.
NETWORKING DEVICE - Remote Desktop Device Redirector Bus
Control Panel / Device Manager, View menu / Show Hidden Devices
Settings / System / About / Advanced System Settings
/Performance Settings button/ Data Execution Prevention Tab
Select Turn on DEP for all programs
NETWORKING DEVICE - Remote Desktop Device Redirector Bus
Control Panel / Device Manager, View menu / Show Hidden Devices
- Disable or Uninstall: /System Devices\Remote Desktop Device Redirector Bus
Disclaimer:
Now, this experience (case to case) will vary, since not all desktop PCs/laptops are built/configured identically.
As in my case, I have a very unique PC desktop configuration/set-up and/or security hardening settings when it was in Windows 10 Pro.
Now that I seamlessly transitioned to Windows 11, I also successfully inherited my Windows 10 security hardening settings.
I'll shout it out loud, "Yes!"
And raise a double thumbs up to that!
Kudos! Microsoft!
With that said, I am not responsible to whatever outcomes of your own upgrade.
I can only speak of my seamless/problem-free experience which I am sharing herewith.
"Always err
in the side of caution."
Reference:
If you like this blog,
Till next blog post.


Post Comment
Post a Comment